Peppermint Bark.

Oh, peppermint bark! I started making this easy recipe with my mom a few years back when we both got addicted to Williams Sonoma's version (you know how they hand out those samples? We used to eat a lot of samples...) So we decided to start making it ourselves and would whip up an enormous batch of this stuff, giving it out to my dad's clients and family and friends. This year, I was really itching to make some more, and even though Christmas is right around the corner, my mom and sister dropped what they were doing for the chance to spend some time making this favorite old recipe. There's nothing like goofing off in the kitchen and making yummy treats with your kinfolk. I hope you get a chance to make this one over the break with your loved ones!

Ingredients:
- 1 bag semi-sweet chocolate (Ghiradhelli melts the best for this recipe)
- 1 bag white chocolate (again, get Ghiradelli if you can)
- 1/2 tsp. peppermint oil, divided
- crushed peppermints
- Optional: a drop of olive oil

Method:
1. Line a cookie sheet with parchment paper. Set aside.

2. Melt the semi-sweet or dark chocolate in a double boiler over the stove. This is a pretty active method, so you don't want to step away from the stove, even for a minute. Be ready to stir continuously and monitor the chocolate so that it gets perfectly melted and not burned. It's a timely activity, so stay in the moment!

Note: If you don't have a double boiler, you can achieve the same effect by placing a saucepan on the stove with about an inch of water in it, then placing a heat-safe bowl over the top of the saucepan. Place the chocolate in the bowl, not the pot, and allow it to melt slowly in the bowl.

3. Once the chocolate is almost completely melted, add in 1/4 tsp. peppermint oil and stir continuously until thoroughly mixed.

Note: if the chocolate is starting to get chalky, add 1 drop of olive oil and continue to mix.

4. Once fully melted, immediately remove the chocolate from the heat by pouring it into the lined baking sheet. Spread out the chocolate with a spoon, so that it's a very thin layer of chocolate that covers the entire sheet. Place the sheet in the freezer for about an hour and prepare for round two.

5. Quickly rinse out the darker chocolate and prepare the double boiler for the white chocolate. Melt the white chocolate over the stove the same way, adding another 1/4 tsp. once the mixture is almost completely melted.

6. Once melted, remove the chocolate from heat and pour over the top of the darker chocolate (you will have to pull this out of the freezer, but it should be fine at this point for the white chocolate to go on top). Smooth out the white chocolate with a spoon. Add the crushed peppermint by sprinkling a liberal amount over the top.

7. Return the bark to the freezer for at least another hour.

8. Once completely frozen, break into 1-inch piece and enjoy! You could share it. Or not. :)

Have so much fun with this holiday treat! I hope you're having the merriest of all Christmas weeks :)

Pomegranate, Oat, & Dark Chocolate Cookies

I wanted to make a festive cookie in honor of the Christmas season, and this little one was born. I LOVE IT. I've been doing a lot of experimenting with pomegranate lately and I am loving every single use for it. On salads, in drinks, and now, in cookies! In this recipe, the pomegranate seeds replace the raisin in a typical oatmeal cookie, and they add a much brighter punch to this one. And the dark chocolate mixed with the flavor of the pomegranate juice... mmm it's sinfully good. Surprisingly, the pomegranate arils hold up remarkably well during the baking process.

This recipe is essentially for a double batch (around 60 cookies), but I purposely made it this way because these are the best cookies to share! Also, if you make a ton of the dough, then you can just leave it in your freezer and pop a few cookies in the oven whenever you have a hankering :) But you can obviously cut this recipe in half if you have more self control than me. I find myself waking up at 3am like, MUST HAVE POM COOKIES. It's a wonderful problem. Prepare to get addicted, friends.

Ingredients:
- 2 1/2 cups organic flour
- 2 cups oats
- 1 cup pomegranate arils (here's a great tutorial on how to remove pomegranate seeds from the fruit)
- 1 cup dark chocolate chips (or you can use semi-sweet - I love these from Ghiradelli)
- 1 cup butter, softened at room temperature (I love using salted Kerrygold - you can taste the difference!)
- 1 cup organic brown sugar
- 1/2 cup organic granulated sugar
- 2 eggs
- 2 tsp. vanilla extract
- 1 tsp. baking powder
- 1 tsp. baking soda
- 1/2 tsp. salt
- a pinch of cinnamon

Method:
1. Preheat the oven to 375 and lightly grease your baking sheets.

2. Using a beater or mixer, cream together the butter and the sugars. TASTE IT. That, right there, is like my favorite taste on Earth. Savorrrrrrrr. Okay, moving on.

3. Once the butter and sugars are creamy and smooth, add in the eggs and vanilla. Continue to mix well.

4. In a separate mixing bowl, combine the flour, oats, baking powder, baking soda, salt and cinnamon. Stir them together until the ingredients are evenly mixed.

5. While your mixer is on, slowly add the dry mix into the butter/sugar situation. Allow the mixtures to combine before adding more dry mix. Continue this until the dry mix is completely mixed in. Oh dough.

5. Finally, using a spoon, stir in the chocolate chips and pomegranate arils. Be gentle with the pomegranate, because those seeds might burst if they are handled too vigorously. Protect the seeds, and they will be good to you.

6. Spoon out the dough mixture and roll the dough into 1-inch balls (a little smaller than a ping pong ball), placing them an even distance apart on the baking sheet.

7. Bake at 375 for 12 minutes. They might not look completely done when you take them out of the oven, but take them out! You really don't want this cookie crispy, because it is SO GOOD when it's just lightly golden. Trust me here. If you have a cookie rack, transfer the cookies and allow them to cool for a few minutes.

I'm excited for you to try these! I like to pretend these are okay to eat for breakfast because they have oats in them... so I eat them for breakfast.

If you give them a whirl, please leave a comment below and let me know what you think. Happy munching and sharing this Christmas season, my friends! xox.

P.S. - My giveaway for this 2016 Papermoss Post Card Calendar ends tonight and the winner will be contacted tomorrow. Make sure to place your entry!

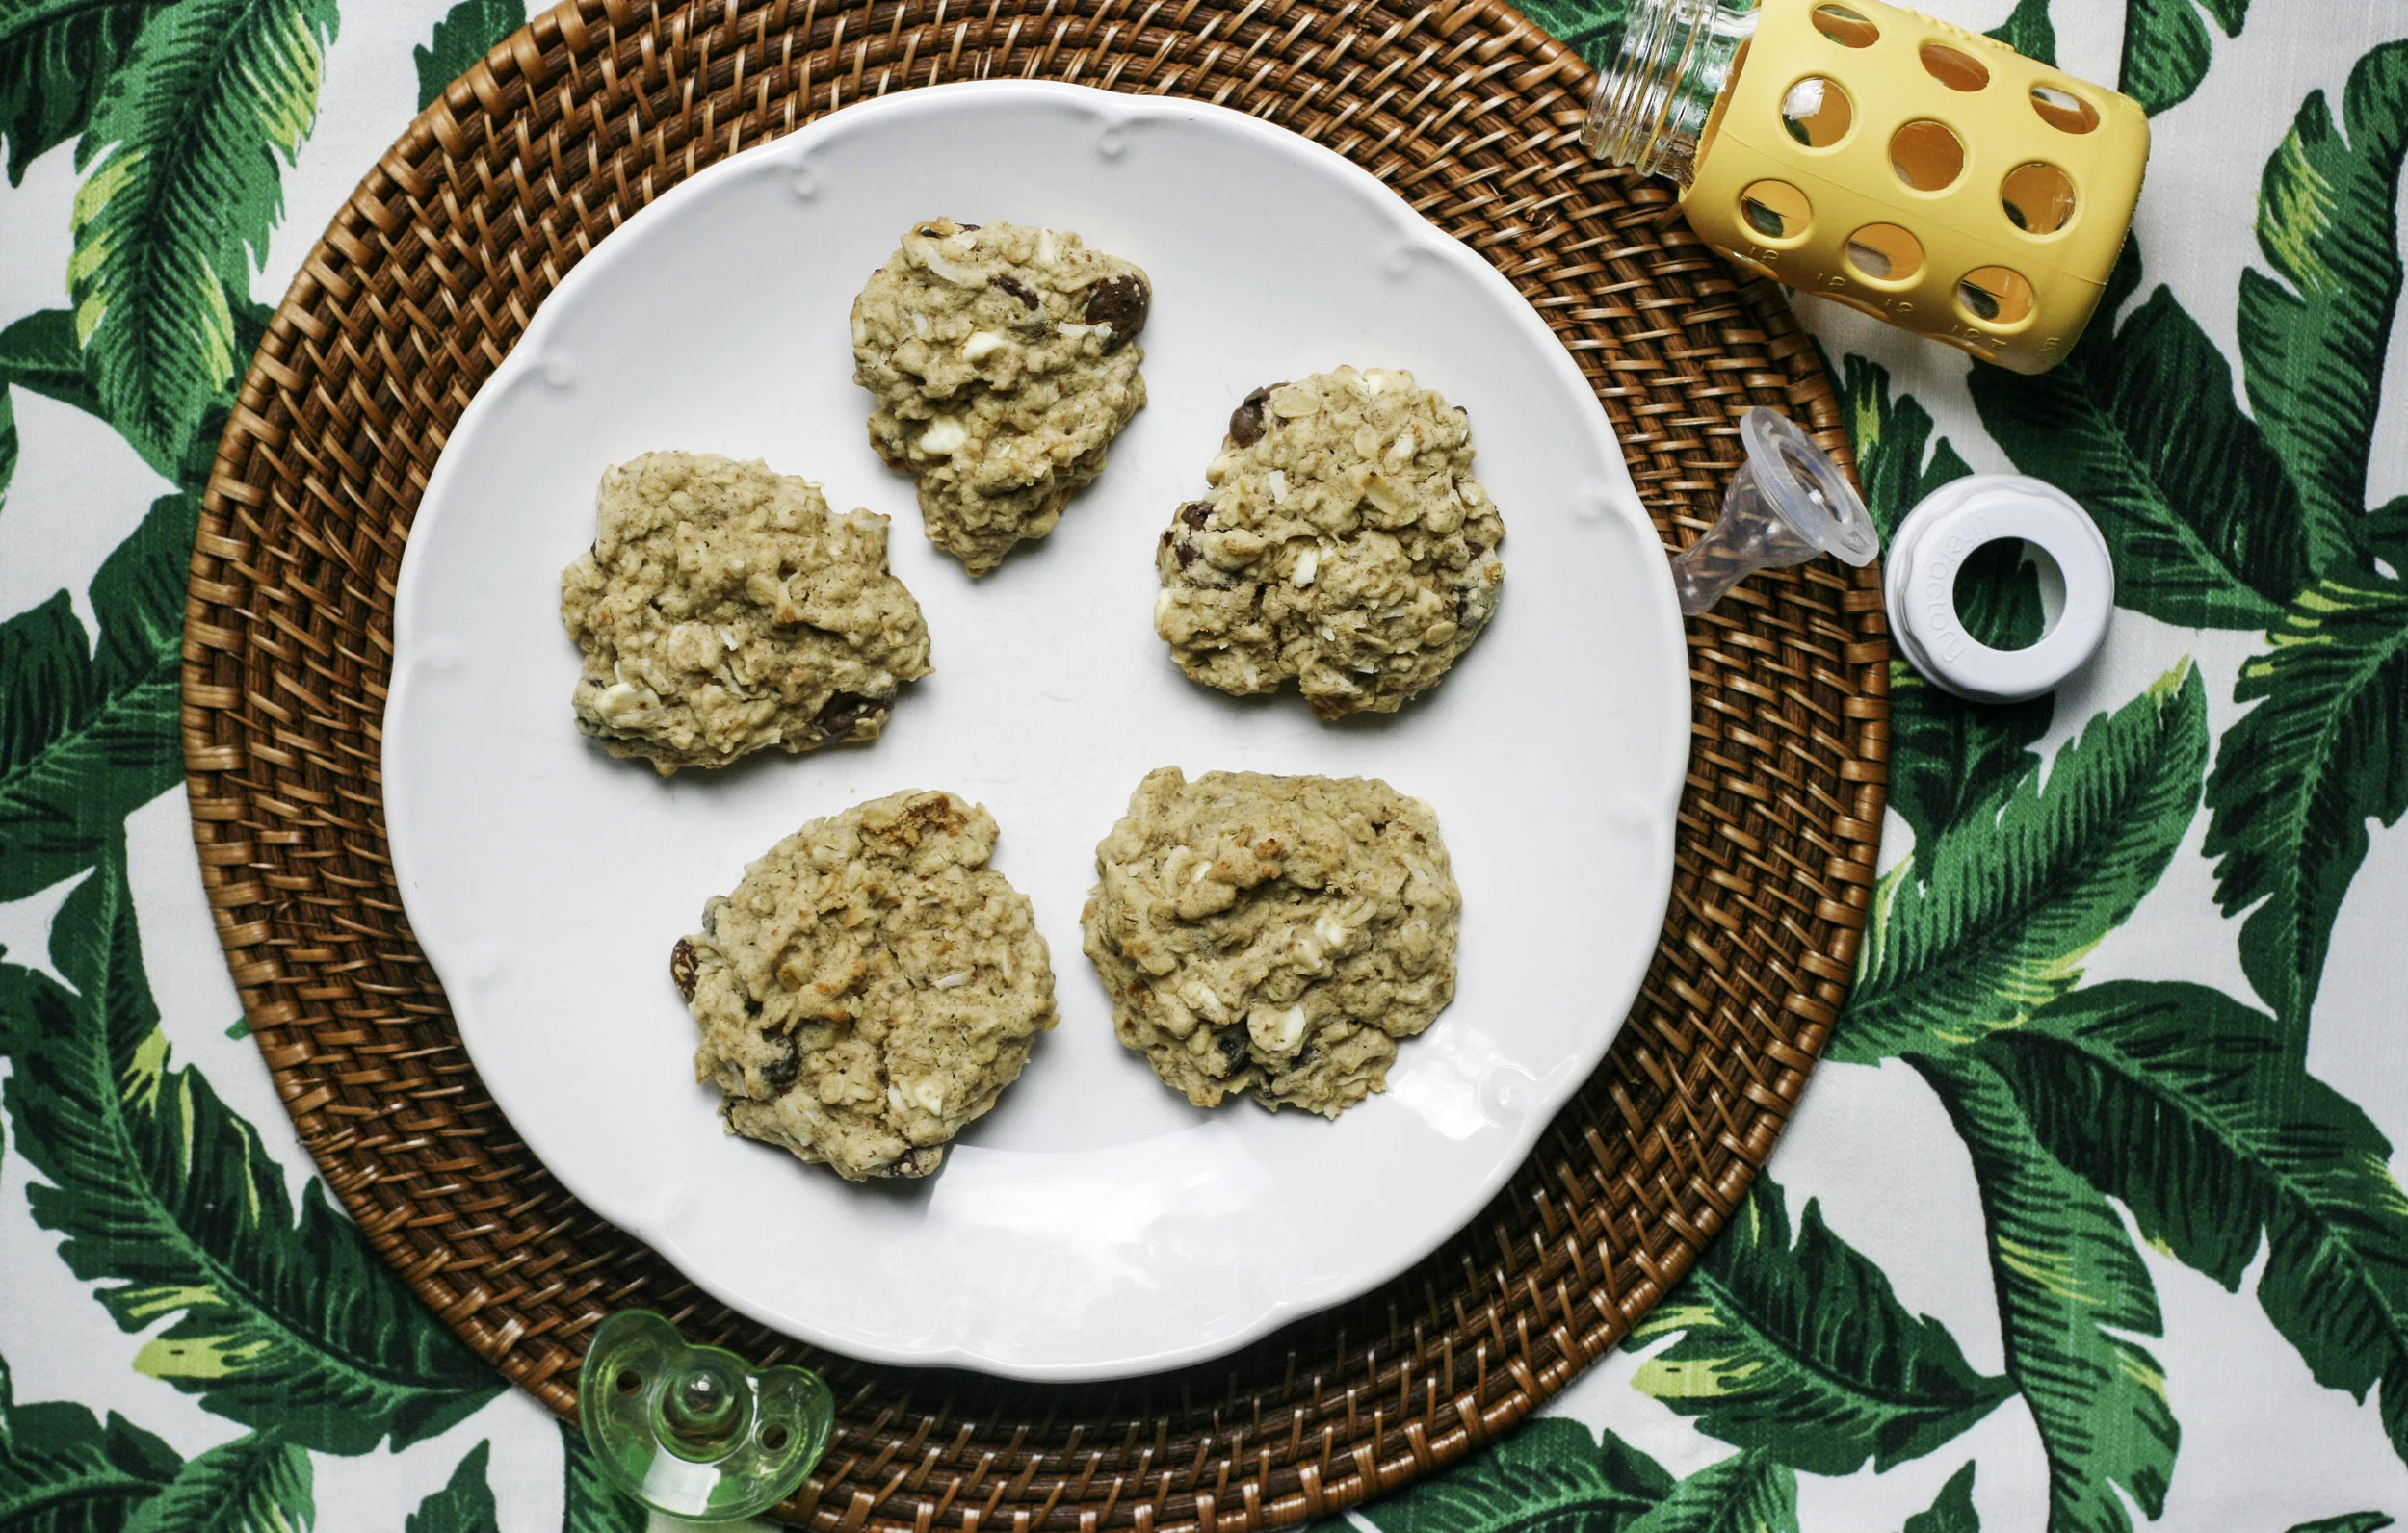
TASTE: Milkmaid Cookies (for lactating mamas!)

Cookies1.jpg

TASTE: Milkmaid Cookies (for lactating mamas!)

This recipe is my secret weapon.

As a nursing mother, I have experienced the highs and lows of breastfeeding during my almost 10-month journey. If you are experiencing a drop in your milk supply, but you want to continue breastfeeding, cook up a batch of these cookies and get to eating! The combination of flaxseed, Brewers Yeast (an awesome super food!) and oatmeal is some kind of magic sauce, and helps increase the lactation. I like to refer to these as my boobie cookies, but that probably seems kind of crude to some of you. Although, if you do refer to them as your boobie cookies around the house, it might scare your husband from polishing them all off. I told mine that these would make him grow boobs and start spraying milk in public. However, doesn't seem to fear this, because these cookies still disappear... I need a new scare tactic.

Many thanks to my sister for introducing this recipe to me. I've tweaked it a bit, subbing in a few different kinds of sugar instead of using white sugar. I also added in the variety of chocolate and white chocolate chips and raisins, because I like my cookies to have some extra flavor. Plus, the flavor of the Brewers Yeast (the main ingredient that helps increase milk supply) is pretty bitter, so adding in some punches of add-ins really helps. Also, I used some steel-cut oats because it makes the cookies super nutty and chunky, but if you don't love that texture, you can use all regular oats.

Ingredients: (*Updated as of 4/12/2017!)
- 3 cups of old-fashioned rolled oats
- 1.5 cups unbleached organic all-purpose flour
- 5 tbsp. brewers yeast
- 3 tbsp. ground flaxseed
- ½ tsp. baking powder
- ½ tsp. ground cinnamon
- ¼ tsp. salt
- 1 stick butter, softened
- 4 tbsp. coconut oil, softened
- 2 eggs
- 2 tsp. vanilla
- 1/3 cup organic white sugar
- 1/3 cup organic coconut sugar
- 1/3 cup maple syrup
- ½ cup dark or milk chocolate chips (the Ghirardelli kind are my fave)
- ½ cup white chocolate chips (again, the Ghirardelli are the best)
- ½ cup raisins
- ½ cup shredded coconut

I had the cutest little kitchen helper.

Mixing bowls really entertain babies in the kitchen. Another secret weapon!

I like to freeze half the batch in this "cookie log", then have some for later! Just wrap the remainder in parchment paper and then re-wrap in plastic wrap and store in the freezer.

Method:
1. Preheat the oven to 350 degrees.

2. In a large bowl, combine the oats, flour, yeast, flaxseed, baking powder, baking soda, cinnamon and salt. Mix well.

3. In another bowl, cream together the softened butter and coconut oil on medium speed. (Letting the butter sit out for an hour before baking makes ALL THE DIFFERENCE. It makes the entire batter soft and fluffy.) Slowly add in the white sugar, then the coconut sugar, then finally the maple syrup. Add in the two eggs and continue to beat until combined.

4. Slowly begin to pour the dry mixture into the wet mixture, continuously beating the mixture to combine the two until both are fully combined.

5. Begin stirring in the chocolate (white and dark/milk) chips and raisins until evenly distributed.

6. Using an ice cream scooper, scoop 1-inch rounds onto a baking sheet, spaced about 2 inches apart. Bake for 10-12 minutes, or until the bottoms are just slightly golden. Let cool completely before storing in a sealed container.


A few notes:- I recently changed over to this recipe and it tastes sooo good, not like a "healthy" cookie, but like a really good cookie! So beware, your family will totally snatch these from your stash. Even if you warn them that they will grow boobs from eating them - my boys are willing to take that chance apparently ;)
- This recipe will yield so many cookies. I actually baked about 1/4 of what this calls for a froze the rest into the cookie logs shown above. It's always nice to pull the frozen dough out of the freezer, slice them up and have hot cookies in 10 minutes. :)

Let thy milk flow.

I guarantee that you will experience some increase in your milk supply if you eat a few of these cookies each day. Let me know if you give these a try and how they work out for you!

Get your milk on, ladies.

P.S. - From the first photo - Palm table runner, table chargers, our favorite baby pacifiers and favorite baby bottles.

The 9th Day: Maple Glazed Pumpkin Oatmeal Cookies

Maple Glazed Pumpkin Oatmeal Cookies.

‘Tis the season for warm treats! I created this recipe especially for the awesome folks at The Epicurious Community Table and Reynolds to Make Meal Magic, and I am thrilled to share it with you today! Pumpkin adds a delicious twist to the good old-fashioned oatmeal cookie. Who says that pumpkin is only for Thanksgiving? I so disagree. Drizzled with maple glaze, this delightful indulgence will give you a hankering to cozy up with a book by the fire while Michael Buble croons from your docked iPhone :) Effortlessly prepare large batches of these treats in less time by using the cookie baking sheets. Then simply enjoy serving the most popular treat at this year’s holiday gathering!

Ingredients:

- 1 3/4 cups all-purpose flour

- 2 cups quick-cooking rolled oats

- 1 teaspoon pumpkin pie spice

- 1 teaspoon baking powder

- 1 teaspoon baking soda

- 1/2 teaspoon salt

- 1 cup butter, softened

- 3/4 cup granulated sugar

- 3/4 cup brown sugar

- 1 15-ounce can pumpkin

- 1 egg

- 1 teaspoon vanilla

Glaze:

- 2 cups powdered sugar

- 3 tablespoons milk

- 2 tablespoons maple syrup

Prep:

1. Preheat the oven to 350°F.

2. Line cookie sheet with Reynolds® Cookie Baking Sheets Nonstick Parchment Paper.

3. Combine the flour, oats, baking powder, baking soda, salt and pumpkin pie spice in a medium bowl; set aside.

4. Beat the butter and sugars in a stand mixer on medium speed until light and fluffy, about 5 minutes. Stop the mixer and scrape down the sides of the bowl with a rubber spatula.

5. Add the egg and vanilla, return the mixer to medium speed, and beat until incorporated, about 30 seconds. Stop the mixer and scrape down the paddle and the sides of the bowl.

6. Add half of the reserved flour mixture and beat on low speed until just incorporated.

7. Add half of the pumpkin and beat until just incorporated. Repeat with the remaining flour mixture and pumpkin until combined.

8. Drop 2-inch dough rounds on cookie baking sheet, staggering them 2 inches apart.

Method:

1. Bake cookies for 12 minutes.

2. Rotate the pans from top to bottom and front to back.

3. Bake the cookies for another 5 minutes.

4. Remove cookies from the oven. Using oven mitts, simply slide cookie baking sheet onto wire rack and let cool completely.

For the Glaze:

1. Combine ingredients in a medium bowl and whisk until evenly combined.

2. Dip spoon in glaze and drizzle over the cookies in a zigzag pattern. Let the cookies sit on the cookie baking sheet at room temperature until the glaze has set, about 20 minutes.

REYNOLDS KITCHEN TIP: You can cook large batches by preparing one set of cookies on the cookie baking sheet while another batch bakes. Then simply slide the cookie baking sheet with the baked cookies onto a cooling rack and you can immediately put another batch of cookie dough in the oven. It saves time and – BONUS – makes clean up a breeze.

Get to it!

I hope you enjoy making these for your loved ones during the holiday!

First published on Epicurious and Parade here with paid sponsorship by Reynolds Consumer Products. Used with permission of Tidal Labs.

Thanks for supporting this sponsor and allowing me to create fresh and unique content like this for Oy!

TASTE: Pumpkin & Cream Tartlets

Pumpkin & Cream Tartlets.

Happy Thanksgiving week! I'm sure your home is buzzing with holiday plans, presents stealthily hidden into musty closets waiting to be wrapped, kitchen working overtime pumping all kinds of toasty delicious aromas throughout the house. This is the beginning of the most wonderful time of year!

I wanted to share with you my favorite holiday dessert. I've made it every year for Thanksgiving at my parent's house, but I love it so much that I continue to make it for festive gatherings through New Years - who says pumpkin is only for Thanksgiving? That's just crazy talk. These tartlets are perfect for keeping that sweet tooth in check, because they are bite-sized bits of decadence. And seriously, seriously easy to create. They have a creamier, lighter flavor and texture than regular pumpkin pie, which provides that much-needed refreshing twist on the whole pumpkin-at-Thanksgiving thing. My personal secret is that I like to use a Ziploc bag to pipe everything beautifully into the tarts, because it makes them seem fancy. But if you need really delicious recipe and you're short on time, you can easily spoon them into the little filo dough cups and experience the same rich taste. This would be a great addition to any dessert buffet because they are just so pretty and dainty. And for real, TASTY.

Ingredients:

- 1 can organic pumpkin (I like this Trader Joes version)

- 3 packages frozen mini filo cups (You can find these in the frozen section next to the puff pastry, 3 packages makes 45 tartlets)

- 1 3.4-oz. package of instant cheesecake pudding (I use this Jello version

- haven't been able to find a good replacement for this... yet)

- 1.5 cups heavy whipping cream (divided)

- 4 tbsp. Sugar in the Raw

- 1 tsp. pumpkin pie spice

// Isn't this mixer a beaut? It's my mom's, but I'm hoping Santa brings me one this Christmas... //

Method:

1. Place a metal mixing bowl and metal mixing whisk in the freezer for 15 minutes.

2. Pull frozen mini filo dough shells out of the freezer to thaw while preparing the filling.

3. Once 15 minutes has passed, place the 1.5 cups of heavy cream and 4 tbsp. sugar in the mixing bowl. Mix on medium-high until soft peaks form (this could take 3-5 minutes).

4. Divide the fresh whipped cream in half by scooping half of the cream into another bowl (set one portion aside for later.) Add to one bowl of fresh whipped cream: the can of pumpkin, package of instant cheesecake and pumpkin pie spice. Mix until combined and smooth.

5. Scoop mixture into a piping bag (or in my case, a large ziplock bag with a corner cut) and pipe into the individual filo cups. Top with the remaining fresh whipped cream (I also like to pipe it on top) and a sprinkle of pumpkin pie spice. Voila!

Happy Thanksgiving. 

Let me know if you decide to add these to your Thanksgiving dessert line up this year! Would love to know how it worked out! And I especially wish you a week chock-full of indulgent treats, delicious fireside chats and most of all, ridiculous amounts of family time. Happy Thanksgiving, folks!