Taste: Valentine Heart Tarts!

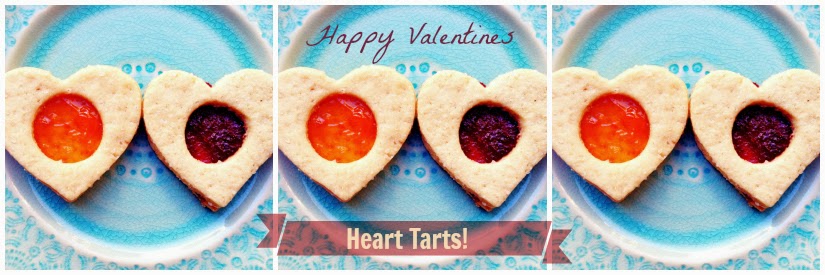
Happy Valentines Heart Tarts.

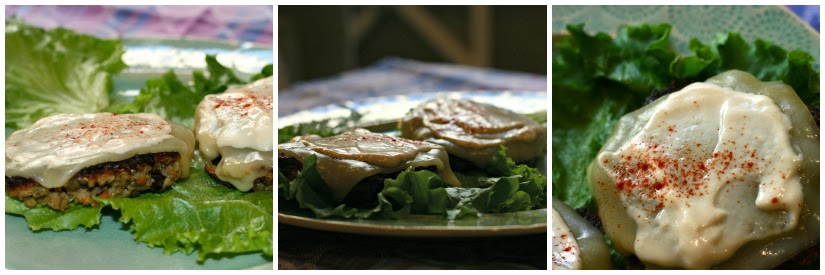
These Valentine Heart Tarts are so adorable. They make a great handmade treat for your loved one. I learned this recipe from my incredible day with

Mary the Cookie Lady

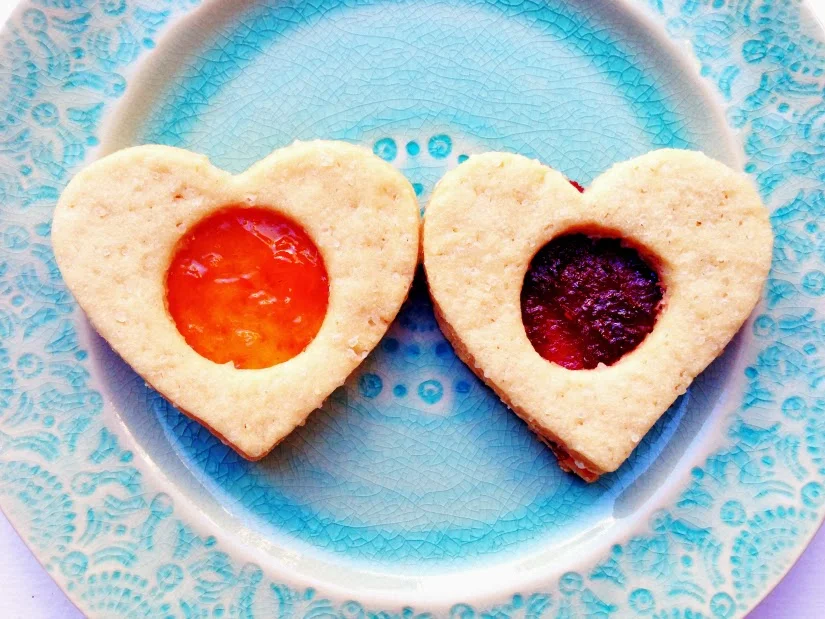
, and have made them a few times since our grand baking extravaganza. My family devoured these in ONE DAY. Officially known as Moroccan Jam Cookies, these cookies are special because they have a shortbread taste with a delicious tart jam filling. And they're shaped like hearts. Duh.

Ingredients:

- 3 cups flour + more for flouring the pastry surface

- 2 1/4 sticks butter (unsalted)

- Little more than 3/4 cup sugar

- 1/4 cup eggs, beaten (I usually end up using 2 eggs, but just see what works)

- Cookie Filling (I use apricot & raspberry baking jam)*

*Baking jam is different than regular jelly or jam. You don't want to use jelly/jam when baking, because it will burn more quickly than a baking jam will. You can purchase baking jam online or find it at a local bakery. Or you can wing it with jelly. Just remember, I told you so :-)

Tools:

My food processor really comes in handy with baking. Instead of mixing the ingredients with a hand mixer, I just throw everything and process it. Until I get one of these bad boys, using the food processor is the way to go. Also, I got my heart-shaped cookie cutter at William-Sonoma. And for the center cut-out, I used a bottle top (from bottled water). Just find whatever works!

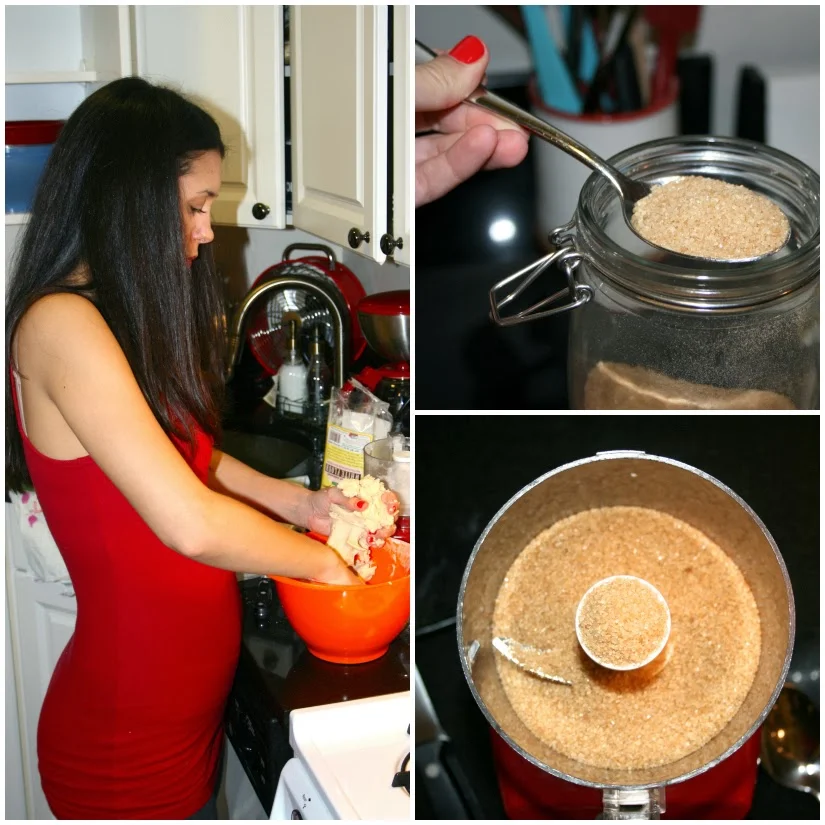
// Using a food processor makes this recipe SO EASY. As long as you're not afraid of getting your hands a little messy :) //

Method:

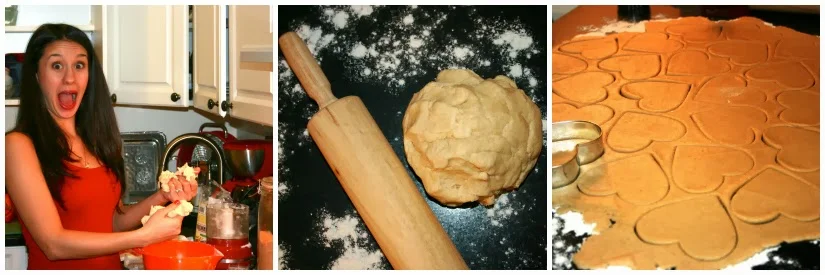
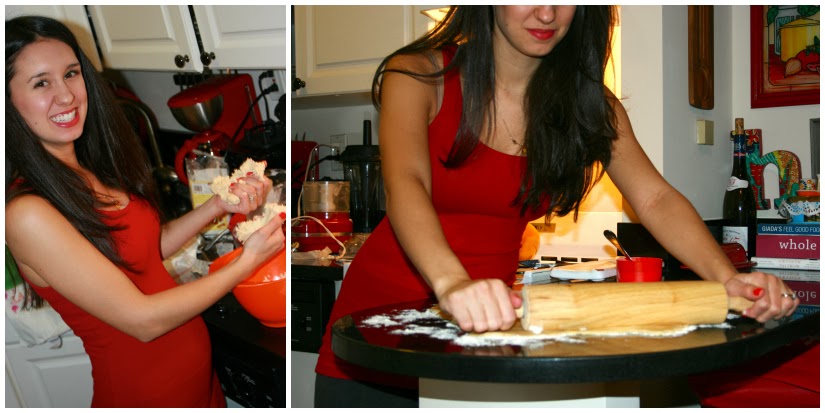
1. Preheat the oven to 375 degrees. Mix flour & butter together in a food processor or mixer, just as you would for a pie. (It's best if you use ice cold butter cut into cubes.)

2. Add the beaten egg (s). Knead the mixture well, it should be sticky at this point.

3. Roll out the dough on a pastry surface. Make sure to lightly flour the surface before rolling out the dough, this will keep the mixture from sticking. Make sure to bathe your rolling pin in flour, as well!

4. Cut out the hearts with a cookie cutter. You will want to count so that you have an even number of hearts with a hole in the middle and without. Eventually, you will layer these one on top of the other, so you want to make sure you have an even number!

5. Bake hearts until lightly brown, about 10-12 minutes. Give them plenty of time to cool.

6. Spread the hearts (without cutouts) with baking jam. Top with the hearts with cutouts. Voila! You should be able to see the jam through the hole in the center of the cookie.

7. Optional: You can lightly sprinkle the cookies with powdered sugar. I chose not to because they already look so pristine!

// The friendliest cookies on the block. //

Oh Happy Day.

If you're snowed in this weekend like me, you could try out this recipe for your special someone. Whipping up a batch of these delicacies is a surefire way to get a whole lot of "I Love Yous!" Also, if you're still looking for a gift, you can check out my Valentine Guide. And if you want to make a loving weekend brunch, try out these yummy crepes.

Happy Valentines Day!

Taste: Artichoke Pesto Farfalle

Artichoke Pesto Farfalle.

Happy Superbowl weekend! I always try to think of something festive to make that doesn't lead with a zillion bad calories. Why is Superbowl food so, well, unhealthy? We're mixing it up this weekend with a ridiculously good pasta. Bless you, Giada, you've done it again.

This Artichoke Pesto Farfalle is a twist on this recipe from Giada's Feel Good Food. I've swapped a few ingredients: farfalle pasta for orzo, diced tomatoes instead of cherry, subtracted the corn (I have a thing about corn), added in pine nuts, that sort of thing. Also, my sister made this the other night, and she added shrimp for a bit of protein. She says it was a hit! The possibilities are endless, but this is a good recipe to have on hand... plus, it's kind of Spring-y, which is always nice when I'm staring out the window at the eternity of snow. At least I can trick my taste buds into thinking that we are almost into warm weather season :-) So...goooooo (insert your team here)!

Ingredients:

- 1 lb. Farfalle pasta (or whatever kind of fancy pasta you prefer!)

- 1 12-oz. jar Artichoke hearts (you could also use frozen, just make sure they're thawed before you cook)

- 2 cups diced Tomatoes (you can use fresh or canned, but if they're canned, make sure you drain them completely before using)

- 1 1/2 cups grated Parmesan cheese

For the Pesto:

- 3/4 cup Olive Oil

- 1/4 cup Walnuts

- 1/4 cup pine nuts (optional, but I just love them)

- 1/2 fresh flat-leaf Parsley

- 1/2 cup fresh Oregano

- Grated zest of 1 lemon

- 1/4 cup fresh Lemon juice (basically the juice from an entire lemon)

- 1 clove Garlic, smashed

- 1/2 tsp. Salt

- 1/2 tsp. Pepper

Method:

1. Cook your preferred pasta to al dente. Drain and set aside.

2. For the pesto, combine the following ingredients in your food processor: 2 cups of the artichokes, the walnuts, parsley, oregano, lemon zest, lemon juice, garlic, salt & pepper and olive oil.

3. Pulse all the ingredients until blended smoothly. You might have to stop and scrape the sides of the bowl to blend everything evenly. This should take a few minutes. Set pesto aside.

4. Chop the remaining artichoke hearts into 3/4-inch pieces and add to the pesto. Add in the (drained) diced tomatoes and parmesan cheese.

Ta da! Your ridiculously delicious dinner is served. The dish itself is so pretty to look at with all the colors, but like I said, you can dress it up a bit more with your preferred protein. I think this is a great option to have on hand on game day, when you might have more than a few (hungry) dudes showing up at the house. Now you have something healthier to serve than chips and queso :-)

Yum yum yum. I want to eat this all over again.

Enjoy your weekend, friends!

Taste: Green Apple & Bacon Grilled Cheese

Mmm. Bacon.

I've got another recipe for you this week! Since it's FREEZING outside (literally, its well below freezing temperatures today), I've been inside a lot, cooking and baking up a storm in my mini-kitchen. This is SUCH a great recipe, and so stinkin' easy. I don't claim that it's the healthiest, but we all like to veg out a bit when it's arctic outdoor, right? This is rich and comforting and indulgent, and isn't that a little bit necessary during the howling-cold month of January? Pair this with a nice tomato soup and an evening all to your Netflix, and you could battle me for the hibernation crown of glory. I invite you to try it.

Ingredients:

- 2 slices of whole-wheat bread

- 2 slices of cooked bacon

- 2 slices of mozzarella cheese (although I suspect gruyere or Vermont cheddar would be to die for, too)

- 1/2 green apple, sliced thinly

- 1 tbsp. butter

Don't love the idea of apple on your grilled cheese? Sub in one of these additions in its place:

- Avocado (to die for!)

-  Portabello Mushrooms

- Roasted Eggplant

- Mustard

- Prosciutto (my mouth is watering here)

- Sliced Tomato

- Artichoke Hearts

Method:

1. You've made grilled cheese before, right? For those of you too healthy to make this on a weekly monthly basis, I'll give you a quick refresher. Drizzle a tiny bit of olive oil in a skillet, and turn heat to medium-low. The lower the temp, the slower it cooks, but this is how you achieve the coveted oozing-cheese situation.

2. As the pan heats up, butter one side of each slice of the wheat bread.

3. Thinly slice half of your green apple (my husband likes this with a red apple, too, so pick your fave and go for it!)

4. Once the pan is heated, place the first slice of bread, butter-side down, into the pan. Place a slice of cheese on top of the bread, then layer the slices of bacon (broken in half), and then the slices of apple. Finish with another slice of cheese and then top the layers with the other side of the bread (butter side up).

5. Let the sandwich cook for 2-4 minutes per side, or until the bottom is golden-brown (just watch to make sure you don't burn it.)

6. Flip it. Repeat. Stop drooling.

7. Inhale sandwich. The end.

Cheesy Delicious.

If you would pay for it at Panera, then it is worth attempting to re-create, right?

Stay warm, friends!

Taste: Oatmeal with Poached Berries

Oatmeal with Poached Berries.

Happy Monday! I've got the best breakfast recipe for you. And it's surprisingly good for you, too, although it taste like the delectable nectar of the gods. If you wake up craving something sweet and fruity, this is an excellent healthy go-to that will leave you feeling pumped and full of energy all day!

Note: This recipe was inspired by this recipe by Giada from her book, Giada's Feel Good Food. However, I swapped the bulgur for oatmeal because A) Bulgur sounds weird and B) Since I am not a prairie girl with barrels of bulgur lying around, I decided to go with something I actually know how to cook: oatmeal. Not a mistake, people. Not a mistake.

Ingredients:

- 2 cups water

- 1 cup old-fashioned oatmeal

- 1 cup organic whole, hulled strawberries

- 1 cup organic mixed berries (I love raspberries, blueberries and blackberries)

- 1/4 cup orange juice

- 1 tbsp. agave

- 1 tsp. fresh lemon juice

Method:

1. In a medium saucepan, bring 2 cups of water (with a healthy dose of salt) to a boil over medium heat.

2. Add the 1 cup of oats, stirring frequently, for about 6-7 minutes. Most of the water should become absorbed and the consistency of the oatmeal should turn creamy.

3. Once the oatmeal is cooked evenly through, set aside and place a lid on the saucepan to keep heat in.

4. In another medium saucepan, combine the strawberries, mixed berries, orange juice and agave. Over medium-high heat, bring the mixture to a boil.

5. Once mixture is boiling, lower the heat until the mixture simmers and cook until fruit is soft, about 10 minutes. Remove saucepan from heat.

6. To dish up, serve the poached fruit on top of the oatmeal and serve immediately. Crazy wonderful taste delight is in your future.

Seriously, this breakfast will be on your mind for the rest of the week. I dare you to make it, because if you do I bet you'll make it twice!

Bon Appetit!

Taste: Black Bean Quinoa Lettuce Burgers

Black Bean Quinoa Lettuce Burgers.

This recipe was solely inspired by my sister and bro-in-law. Over Christmas break, Lauren mentioned to me that her hubby makes quinoa burgers by adding an egg and some spices to leftover quinoa and they're "so delicious." I figured I would experiment a little and give it a try. I'm delighted at how easy these are to make and how deliciously they turned out! Many thanks to Lauren and the ALWAYS creative-in-the-kitchen Brent. You two inspired this radical meal.

Stevie is already asking for it again.

Ingredients:

- 2 cups cooked quinoa

- 1 cup cilantro, chopped

- 1/2 cup black beans

- 1/2 avocado, diced

- 1/2 cup panko bread crumbs

- 1/4 cup diced tomatoes

- 2 eggs

- 1 medium carrot, or 5-6 baby carrots

- Cheese slices (I used mozzarella, because its my fave)

- 1 tsp. ground cumin

- 1 tsp. fresh ground pepper

- 1 tsp. salt

- 1 dash of red chili pepper

- 2 tbsp. olive oil

- A dash of paprika

- 2 tbsp. Veganaise

- Lettuce (in place of buns)

*Note: I've started using Nayonaise, a vegan verson of mayonnaise per the sort of strict cookbook It's All Good. I don't have any kind of issue with mayonnaise, other than it is fattening, and this is an easy way to deliver flavor without the same amount of calories. You can easily sub another topping (like hummus or salsa) if you don't have any in your fridge, but it's worth trying out! I've been pleased.

Method:

1. Bring 4 cups of salted water to a boil. Add quinoa, reduce heat, and continue to simmer for 10-15 mins., until all the liquid is absorbed.

2. Add cilantro, black beans, avocado, diced tomatoes, eggs, panko bread crumbs, cumin, red chili pepper and a generous dash of salt and pepper to the quinoa and mix well. This mixture should be vibrantly colorful by now! Set aside.

3. Place the carrot(s) in a food processor and pulse until finely chopped. Add the chopped carrots to the quinoa mixture. Mix well.

4. Form 3/4 lb. patties with the quinoa mixture. Yes, your hands will get messy, but its kind of therapeutic, too!

5. Heat a large nonstick skillet to medium and drizzle with olive oil. Wait for the pan to get hot, then place patties on the skillet. Cook until browned, about 8 minutes on each side (16 minutes per patty.) Once you flip the patty to the second side, place a slice of cheese on top to melt nicely. Mmm.

6. Serve the patties smeared with veganaise, topped with a dash of paprika and wrapped in lettuce. So healthy and SO ADDICTIVE.

Burgerlicious.

Seriously, these are GREAT. A little bit spicy and a little bit savory. The fun part is that you can even make this with leftover quinoa from a previous meal. Add in all kinds of spices and just have fun with it - you can't go wrong with a burger! Let me know if you give it a try!

Bon Appetit!