Home Tour: Stairway

I'm so excited to share this home renovation project with you today. Like, really really.

One of the first things I knew we would have to change when we moved into our new home was the carpet. The downstairs is all hardwood and the upstairs is completely carpeted. The stairs were also carpeted, and they showed signs of heavy wear and tear. So after we carpeted the upstairs in berber, we focused on the stairs.

I want to share the stairs portion of this project, because we completely re-worked the "look" and I am so proud of how it turned out. When I say "we", I mean that we had an awesome contractor, Nathan, who did the work, and we just made him sandwiches and pretended like we knew what was going on. But ultimately, the vision we had in our minds was completely translated and he did an excellent job. Thanks, Nathan!

The Changes:
1. We decided to keep carpet on the stairs, since it's the most slip-proof option (and especially because we tote a baby up and down the stairs 20 times a day, hello), but they needed a makeover. The old carpet was scary, so that was an obvious first choice: we re-carpeted the stairway in the new berber. We went with Lowes for the carpet installation and we are really happy with the outcome.

Carpet before:

And after:

2. Next, we decided to put hardwoods on the landing between the two staircases. Why? We wanted to dress up the stairway a bit and there was some leftover hardwood from when the floors were done a long time ago. Bam. New landing. And what a difference it makes!

Old landing:

New landing:

3. We re-stained the banister with a darker mahogany finish. Such a difference, from the old oak-y tone of the previous color! And not only do I love this new shade, but it will handle wear and tear a lot better because it's so dark.

Here's an attempt at a photo of the old banister (cute baby is just an added bonus for your viewing pleasure):

And after:

IMG_6329.jpg

4. Then we repainted the trim and the banister spokes with a coat of fresh white, to keep everything looking light and lifted.

5. For cosmetic's sake, we hung our city pictures (all the cities we've lived in together) in the stairway because it just seemed like the perfect spot to visit that art work everyday. And I got a big plant to sit by the staircase, which I swear helps me breathe better as I walk up and down the stairs. Plants clean the air!

And there you have it folks! I know a stairway might not be the most exciting renovation you've ever seen, but it was our first one in our new house, so we're pretty proud of it. I can't believe how much brighter the stairway looks!

One more before and after. Because I want to. And because I CAN.
Before:

Aaaaaaand after!

And there you have it! Thank you for checking out my stair renovation! So, what do you think? Have you ever renovated your stairway? Got any tips for home renovation projects? I've got a few more up my sleeve...

Garden Update Vol.2

Oh, the garden. My, I have learned a lot since I started gardening. I had my first harvest this past week - my radish seeds reached their days of maturity and some lettuce was ready to be plucked. Exciting times in the garden world. So I scampered out in the hazy drizzle and fetched my fair food. And the things I found!

Out of all my radishes, this is the only one that came to maturity. This particular variety is supposed to be long and thin, but this clearly didn't grow to it's full potential. I looked up the variety and tried to figure out why mine didn't grow big enough, and apparently, you have to wait a lot longer for the fall harvest than in the spring. Oops. I was probably premature in picking this one, even though I followed the instructions. So, no radishes for now. But you can see below that I planted a whole slew of more of em, so hopefully I will enjoy a radish salad before winter's end.

While I was harvesting, my gorgeous husband dug up bushes and moved them around the yard for me. When we moved into the house, our box garden was full of bushes and thick hedges. Little by little, we are moving them so that I have more room to grow vegetable plants. He doesn't love that I'm doing this, because he thinks the bushes are pretty, but he is kind to me. (Seriously though, look at that plant in his hand - it's not that pretty.) So he's been moving them for me. I really had to make some room this time, too, because I had a ton of kale that I've been growing from seeds that had to be transplanted into the ground. So another hedge bit the dust. Or you know, got moved to the side of the house. EXCITING STUFF YOU GUYS. I know you are riveted.

My new radish sprouts! This variety will look like the traditional radishes you buy in the grocery store. I mean, hopefully they will look like that. In like 6-8 weeks.

Carrot tops! Cute, right??!

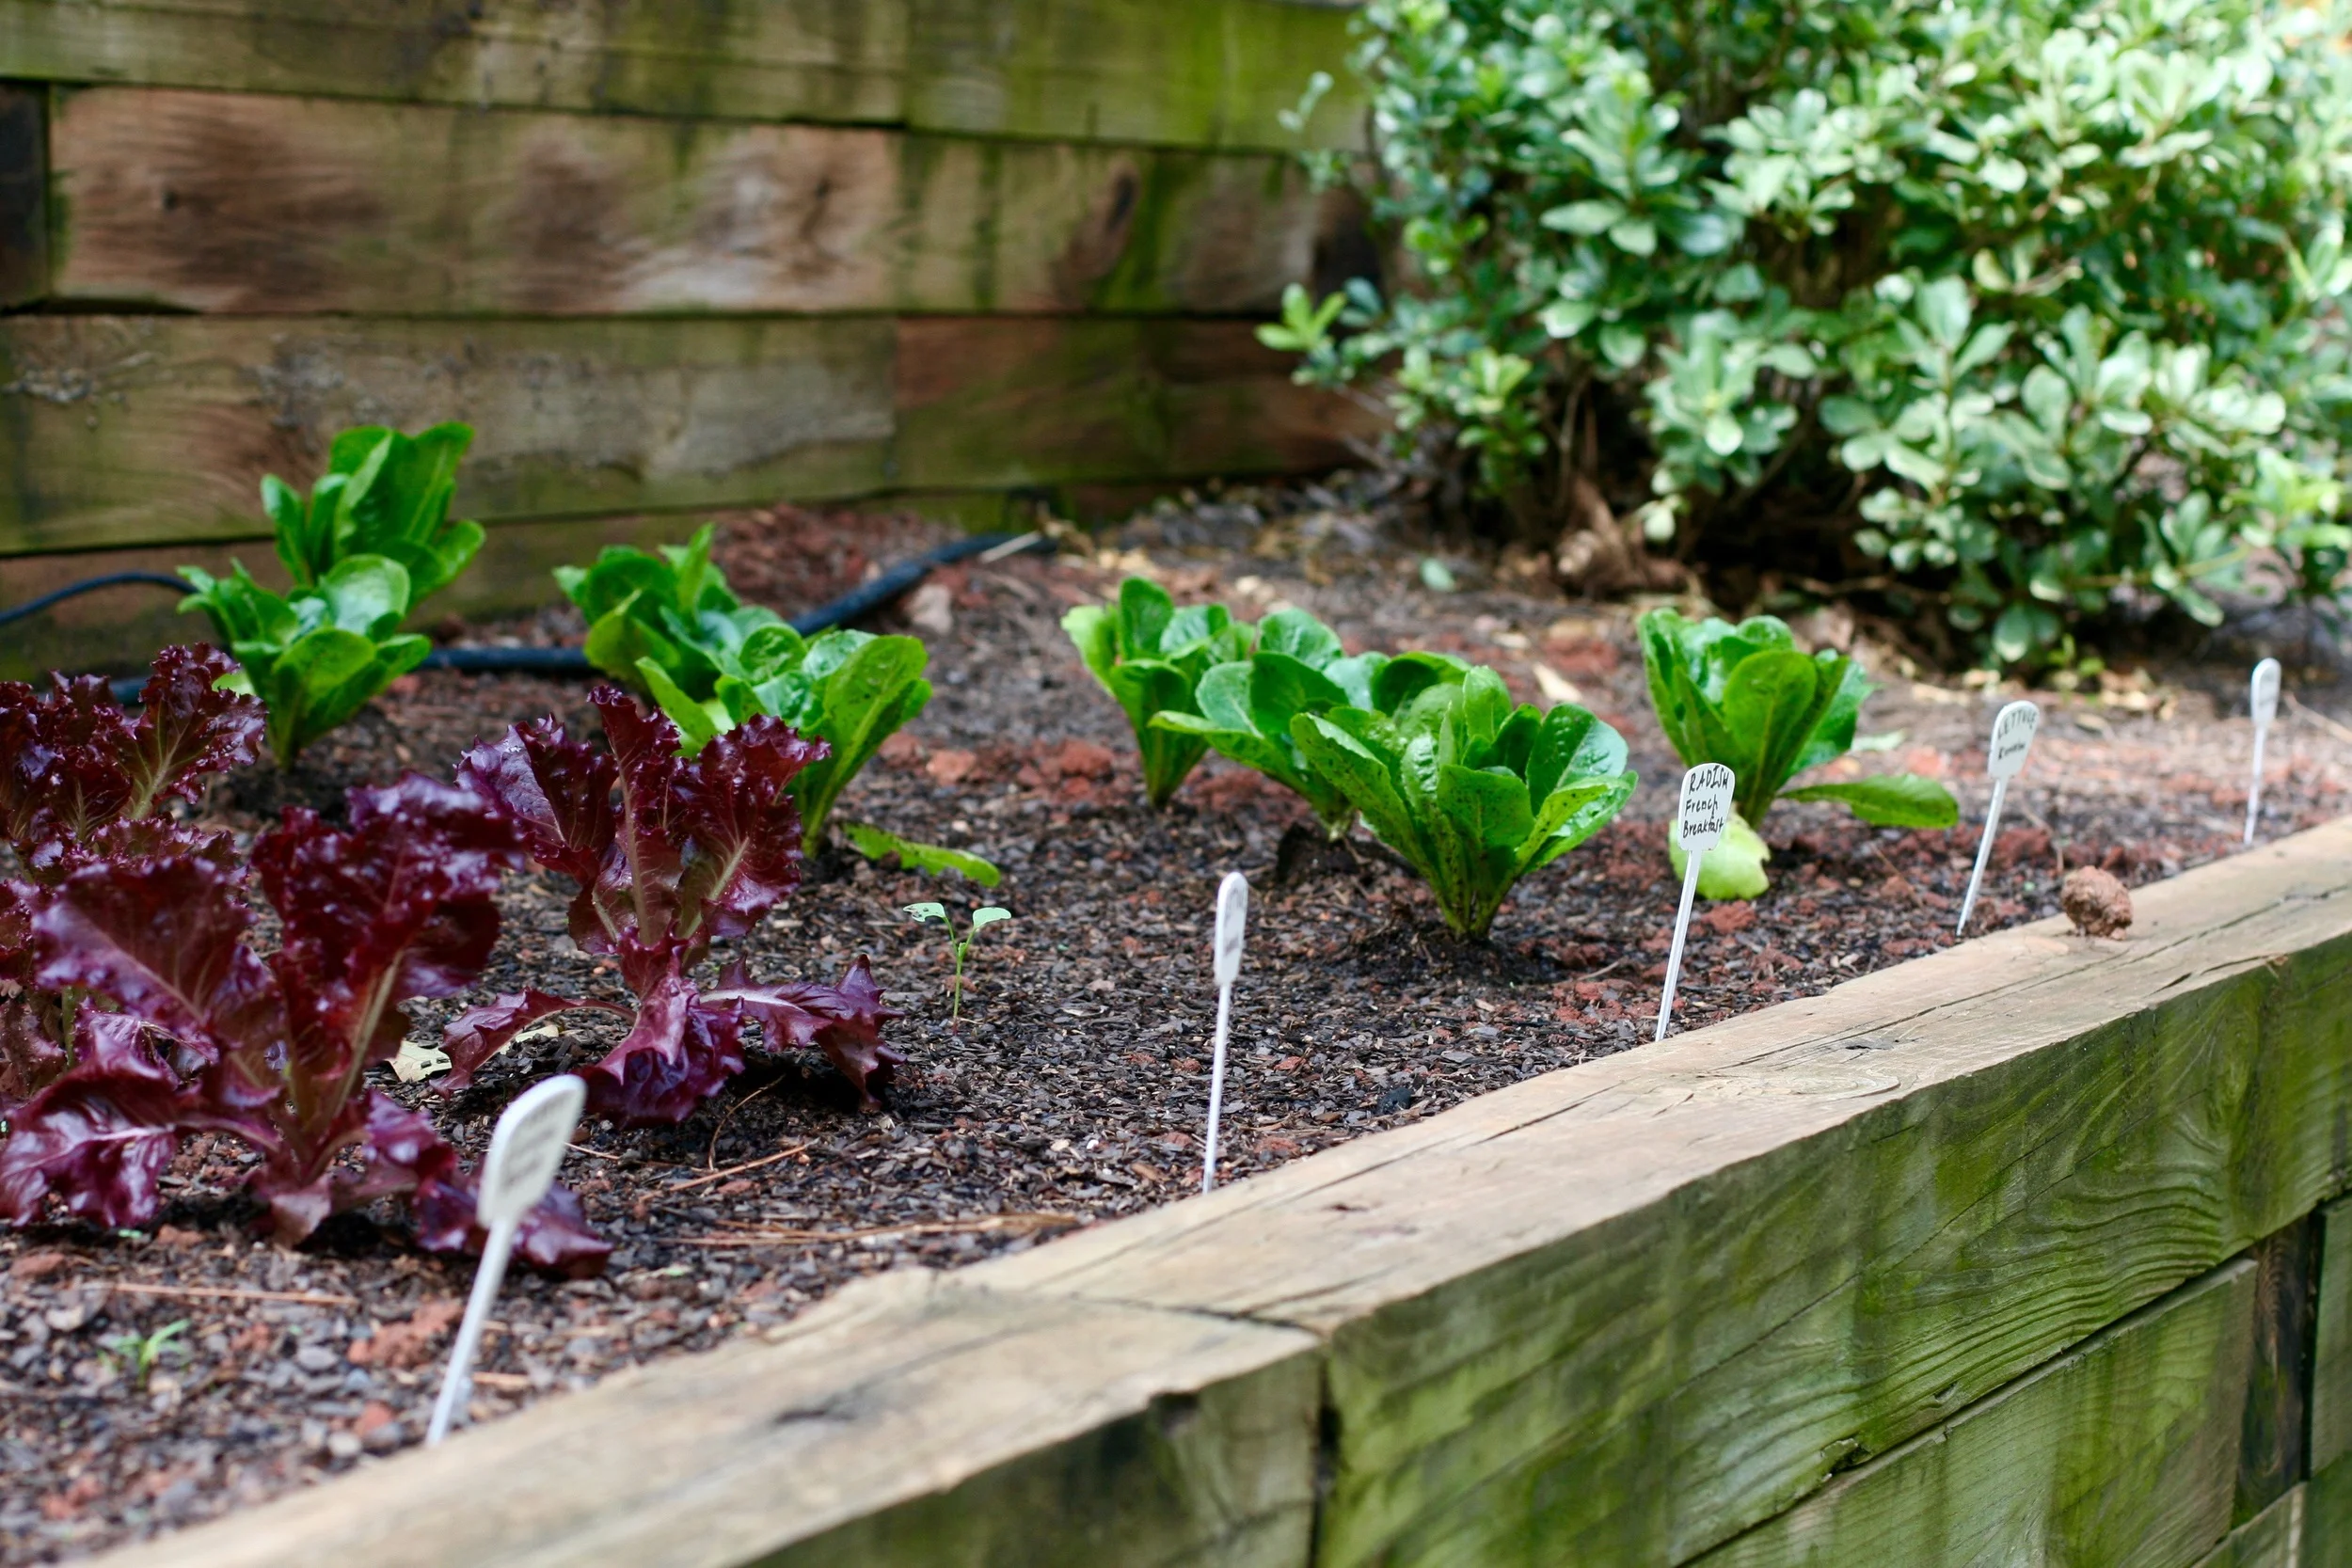
My lettuce is seriously lush. Leafy. And yummy :)

Radish top.

Oh, my heart breaks. This is my sad, sad cauliflower. I hate the demon caterpillars and the havoc they wreaked in my garden. I've plucked off over 60 caterpillars from these leaves, clinging to the underbelly of the leaves and creeping deep inside the plants - it's truly alarming how much damage those little guys can do. I concocted an organic garden spray to ward them off, but I ended up bleaching out the leaves and now the plants look worse than ever. Diseased. They're not diseased, they're just bleached. And eaten through. What's a girl to do??

SAD CAULIFLOWER.

I'm not going to lie. I've been praying for them.

But oh! A bowl full of lettuce! I actually learned a lesson after harvesting this time around. I picked too much! I only need to pick what we will actually eat on any given day, because otherwise the left overs wilt. Like I said, I'm learning! Only pick your salad for the evening.

My lettuce babies. Such good babies.

Is that creepy sounding? Stevie says it is.

But.

They are my babies. I grew them. I tended to them. I watered them when it was annoying to do so and fed them fancy organic plant food and, you know. That's it. That's pretty much all I did.

You're about to see it. That move I've always wanted to do.

LETTUCE BABIES!!!

And that's the update! Things are growing over here! I'm excited to see how everything does as we really transition into fall. Apparently, the cooler temperatures are supposed to help the lettuce and kale taste sweeter. So we will see how that goes. Thanks for coming to my garden, friends!

How to Make Your Own Chalky Paint.

I've been a painting fiend as of late. Moving into my new house, I've been up to my ears in home decor projects. One small way that I've saved some cash is by making my own chalky finish furniture paint, instead of buying the expensive brands found at most home improvement stores. And I've discovered that this is even better than the store-bought stuff! I want to share a few tips for how to make your own paint and save cash on your furniture renovations.

In case some of you are wondering what is the allure of chalky finish paint is, I'm here to help. The beauty of this type of paint is that you don't have to sand or prime the furniture before you you paint. It simply takes care of those steps for you, which saves hours of time. Here is the method I used and a few tips for making your own batch :)

Chalky Paint Ingredients:
- Any shade of any kind of paint you like to use. The sky is the limit.
- 1 box of Paris of Plaster
- 1 Paint stirrer
- 1 plastic bucket
- A few tablespoons of water

Method:
1. Combine 2 tbsp. of water with 2 heaping tbsp. of Paris of Plaster.

2. Using the paint stirrer, mix well until the combination is a smooth, liquid consistency. This batch can be combined with 8 oz. of paint. If you want to make a larger batch, you can double or triple this recipe. Just remember that for every 8 oz. of paint, add another 2 tbsp. of both water and Paris of Plaster. *I like to keep my batches small by using only 8 oz. of paint at a time, see the tips below for my reasoning.

3. Once the paint is combined, you are ready to paint! It's that easy. Seriously. Get your paint on, my friend.

A Few Tips:
1. Choose a shade slightly more vivid than you intend.
When you make your own Chalky finish paint, there will be a slight lightening of the color because of the water and plaster additions. They thin out the paint a bit. Go ahead and choose one shade darker/more vivid than you prefer, so that the color will balance out correctly.

2. Use the entire batch at once.
Because of the ingredients in this mixture, you cannot save any leftover paint for later. The plaster eventually settles and becomes chunky, and you cannot remix it to the exact same consistency. So when you're ready to paint, go ahead and use the entire batch. Then if you want to paint additional coats, you will have to remix another batch. For this reason, I like to make small batches and use up what I have.

3. Sanding and Finishing will add more texture.
Chalky paint dries to a very matte finish. If you want a little more contrast, depth and texture, I would follow up with some light sanding, perhaps some antiquing (you can see how I distressed and antiqued this Living Room Toy Cabinet), and a finishing coat for protection. If you like a high gloss, you can go with a polyurethane, or if you like something more satin-y, I like this Valspar Chalky Finish Sealing Wax.

As you can see above, this is my recent homemade chalky paint labor of love. And I am certainly in love with it! Especially the price tag, which was about $15 total, for all the gear and ingredients. Can't beat that!

Let me know if you try this recipe out and how it works for you. Happy painting, friends!

Upcycled Living Room Toy Cabinet.

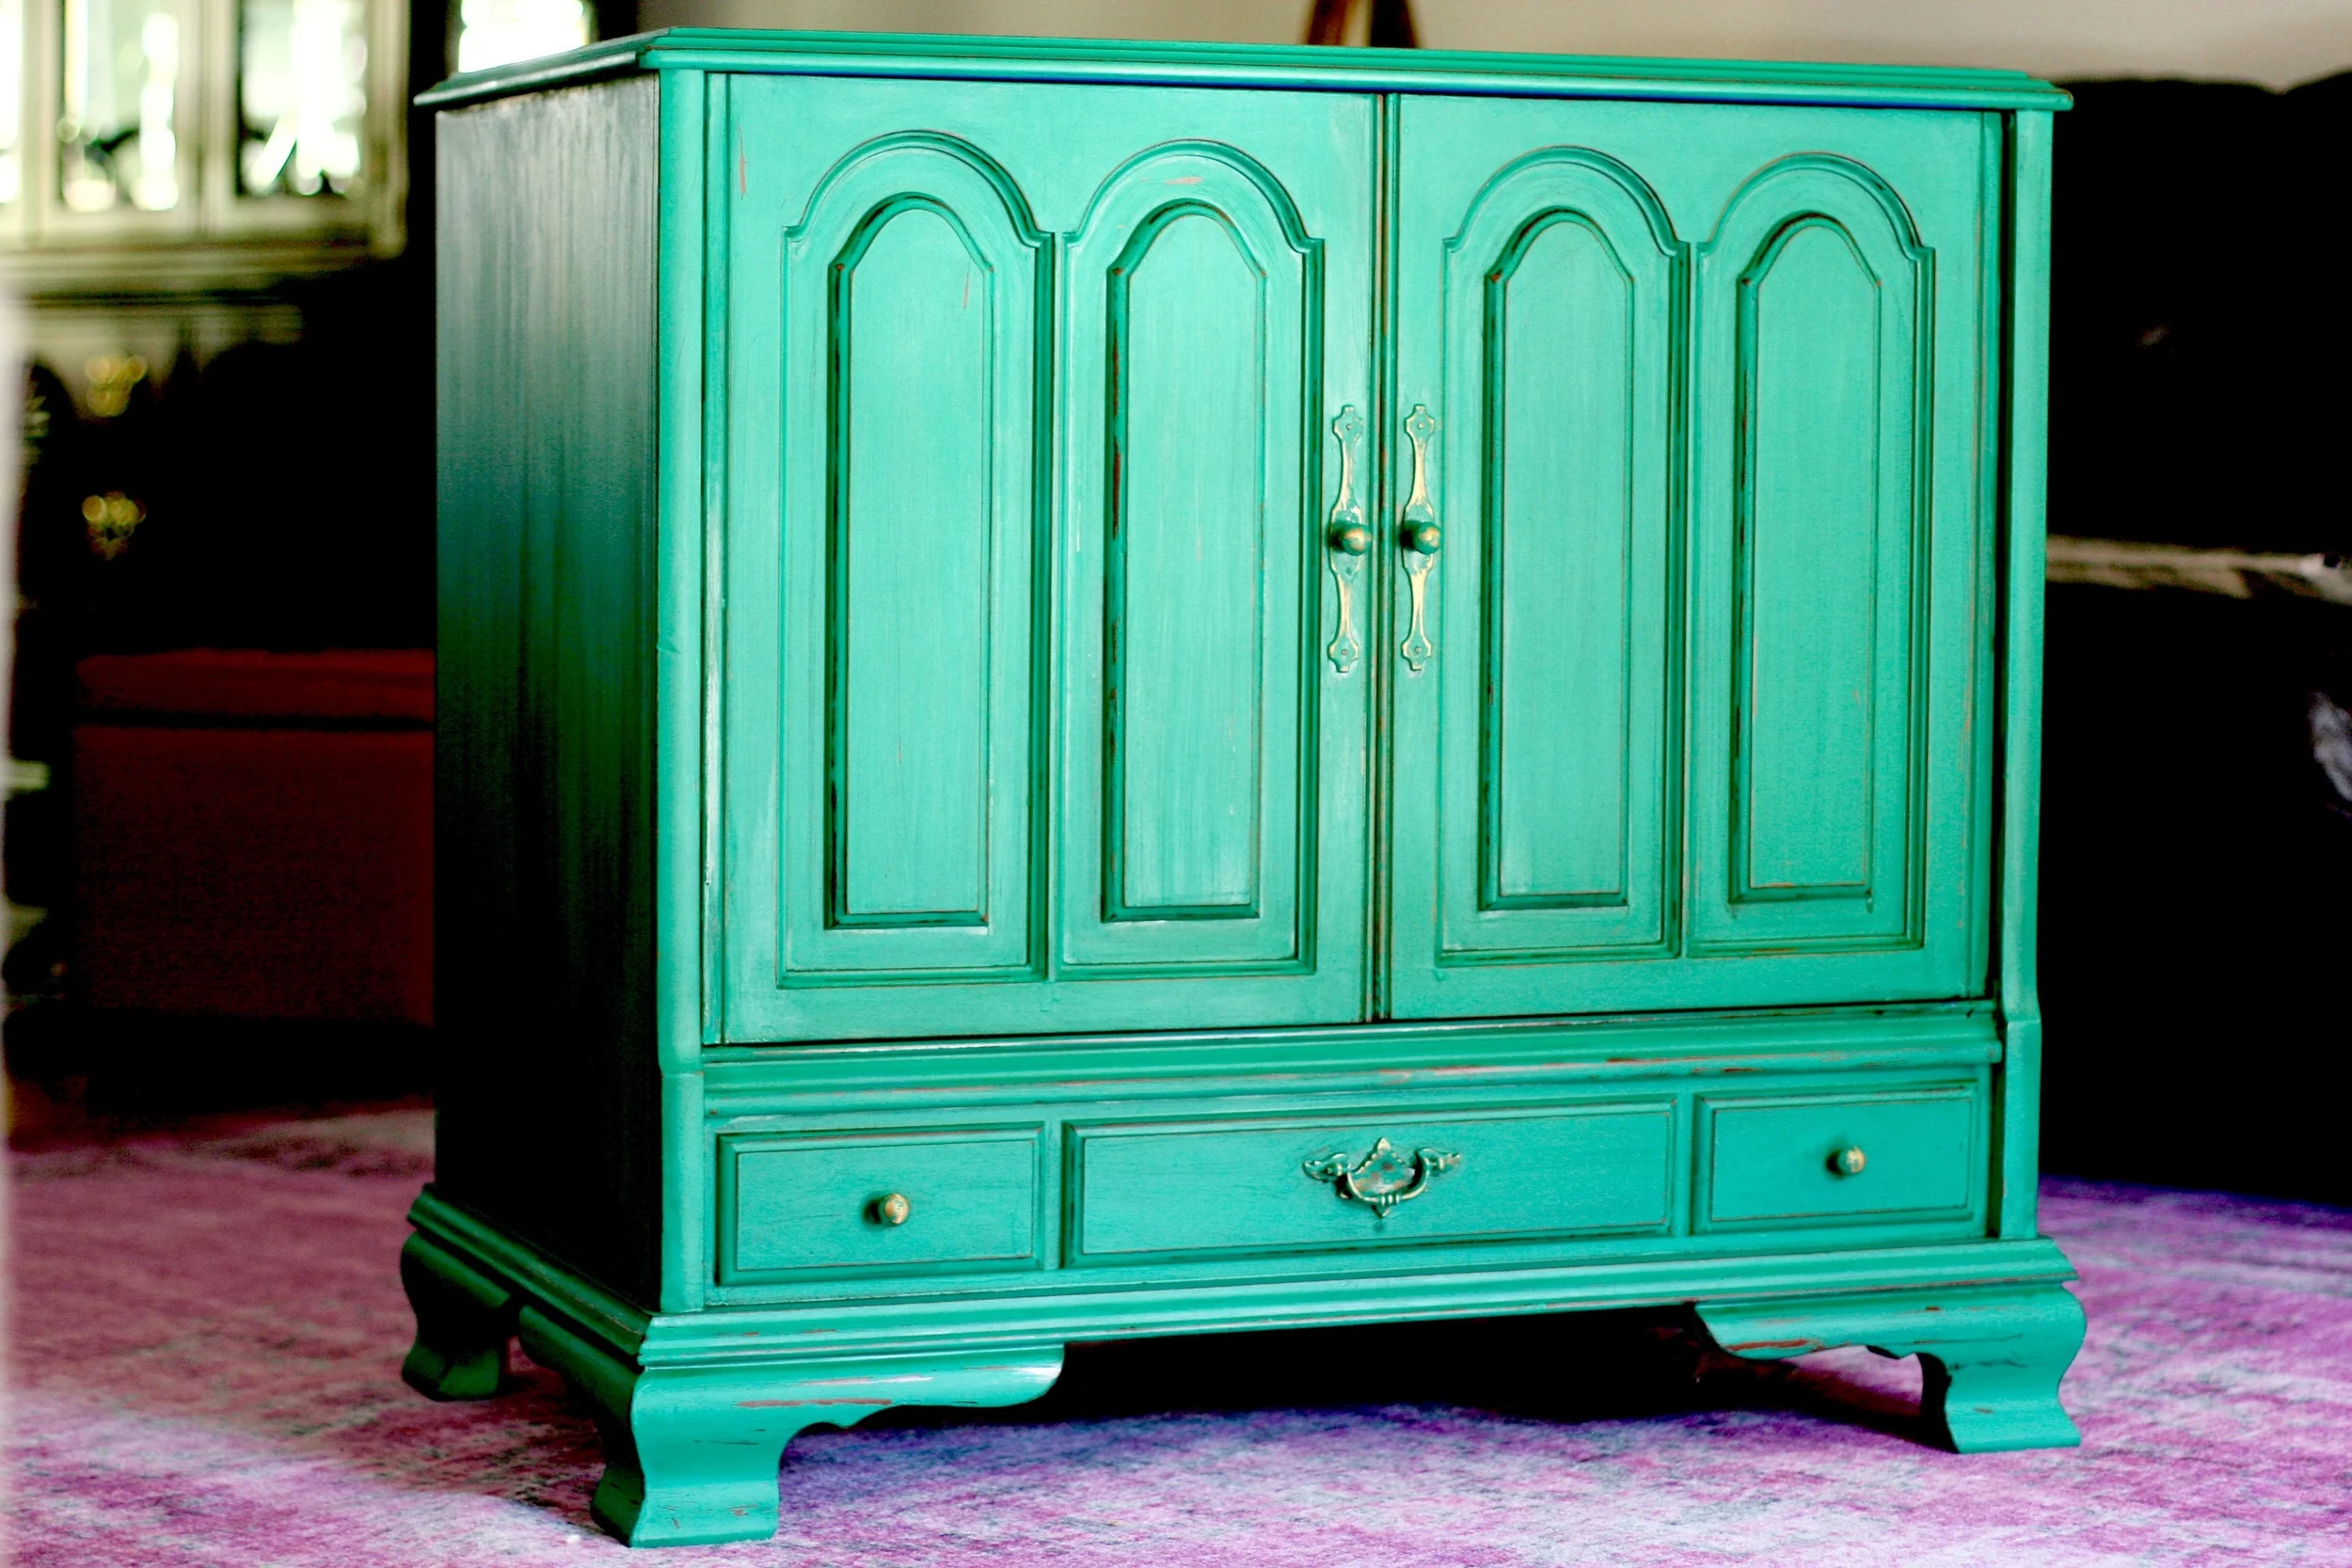
Kelly Green Toy Cabinet

This is perhaps my favorite upcycled piece I've ever done. I was given an old TV cabinet in the slew of free furniture we were given when we moved, and I knew I wanted to turn it into a storage space for Everett's toys in our entertainment room. This actually belonged to my elementary school librarian, Ms. Olham, and was given to someone else, who then gave it to us, so this particular piece of furniture actually has a bit of sentimental value. I was kind of a book nerd, and spent a lot of time in the library as a kid, so I knew I wanted to keep this piece and make it something special. Because of it's largeness and depth, Stevie wasn't sure it would work in the entertainment room, but I knew I had to find a way to make it work. Because, Mrs. Oldham! As I brainstormed about what I wanted for this piece, I was feeling so inspired by the rich shade of Kelly green. I couldn't shake it. So I went with it! Our entertainment room has taken on a vivid, bohemian vibe, and I can't wait to share photos of the entire space once I'm finally finished with it. This piece is one of the centerpieces of the room and I am so so thrilled with how it turned out.

Here is the before:

As you can see, the piece was a lovely mohaghany cabinet with brassy hardware, but it felt a bit bulky and dated. Since I had some success with chalky paint on my bedroom furniture, I decided to tackle this one with the same approach. But this time - I made my own chalky paint! I will share how incredibly easy it is next week on the blog. But trust me - you will never want to pay high dollar for chalk paint again.

It's a little challenging to capture the exact color, but I chose Behr Balsam, a flat interior/exterior paint. And I managed to cover this entire cabinet with just one sample size! Hello, savings. I love you.

After the first coat, things were looking a bit streaky and turquoise-y. I chose not to be fearful.

After the second coat, things were looking extremely matte and, well, bright. Like Sesame Street bright. Much brighter than I had expected. Again, I chose not to question the color choice. I knew I could tone it down in the steps to come.

The inside remained mahogany. Isn't it sort of sad looking? We will get to that in a minute.

Next I sanded the furniture using an extremely course sand paper, 80 grit. I focused on all the edges, crevices, and hardware. Then I just kept going and sanded the surfaces as well, wearing it down to expose the brown underneath in some areas. Just for fun. Because who doesn't like beating stuff up?

Then I decided to get a little crazy. Okay, crazier than painting a cabinet green. I grabbed another paint sample that I had chosen on a whim while I was at Home Depot, one that I had literally no plan for and just bought because I thought it was so pretty... and decided, what the heck? I'll coat the inside of the cabinet with this sapphire-esque blue! Because apparently I am turning my entertainment room into an arabian bazaar. So Behr Indigo Batik coated the inside of the cabinet. And my soul rejoiced.

Rejoice, oh soul. Rejoice.

Then things got really crafty. I used this Varathane Wood Stain in Kona to tone down the shade of the green and give the furniture an antique effect. There are a lot of antiquing waxes on the market, but this was by far the least expensive way to achieve the same effect. I used an old cut up tee shirt to rub on the stain in small sections, then I immediately wiped it off. The stain really soaked into the edges and crevices that I had sanded down, and made the whole piece look like it had been living in the dark corner of an a genie's lair for like a thousand years. Mission, accomplished.

Yum. I couldn't be happier with the finished product.

After the stain dried, I coated the entire piece with Valspar's Chalky Finish Sealing Wax. This protects the paint, so that it doesn't further chip, and also gives it a nice matte sheen.

And there you have it! Everett's toy mecca in our entertainment room. I love the piece so much. I'll admit that my original plan was for the piece to look a bit darker and more Kelly green, but you never quite know how a color is going to turn out until you just go for it. I still love this shade and it's the perfect pop of color for the room. The total cost for this DIY? About $7 for the two paint samples. And that's rounding up. I had the wood stain and sealing wax already, and paid nothing for the furniture itself.

This has become the place to store all of Everett's toys and keeps them out of sight when we want the room to look clean. And he loves toddling over to his cabinet, throwing open both of the doors, and seeing all his stuffed animals and balls and trucks. I'll try to capture his expression soon so you can see it - it's so stinking darling. He loves and I love it and we are all happy in our bohemian living space.

So what do you think? Have you tried using chalky paint to refresh a piece of furniture before?

Garden Update.

It's been about 3 weeks since I planted my first garden. When I say that I didn't and don't know what I am doing, that's not an understatement. I'm not being self-deprecating. I literally have no clue what I'm doing. But you know who does? Pinterest. Google. Those fine master gardeners out there in the world, who are kind enough to share pictures of what spinach seedlings should look like after 10 days. I would be clueless without the Internet. Well, and my friend Dana. She's a master gardener. I've been mad texting her all like, "Is this a good soil brand?" and "What do I do about caterpillars?!"

And now we've come to it. The caterpillars.

Skeezy, selfish, slimy gluttons. They've been decimating my cauliflower leaves. Boring holes into my baby plants.

They are no longer cute. They are more like machete-mouthed thieves of doom. I won't read Everett that book any longer. Caterpillars are the flipping worst. They found my cauliflower and they have almost decimated the leaves - eaten holes through them and now I'm praying my plants will still photosynthesize. I mean, look at these gaping holes. JUST LOOK.

It's like they've eaten holes right through my heart.

Oh, also, apparently I'm also growing what looks like cabbage. I didn't realize I bought cabbage. Didn't realize I planted it. Thought the whole lot was cauliflower. And I thought there was something wrong with a few of the plants because they were so short and growing weirdly. But I remember now that when I was planting, I found a label that said "cabbage" and I thought it was mislabeled, because all the cauliflower plants looked exactly the same.

I am a terrific airhead. It's cabbage. I'm growing cabbage.

I guess that's great! I enjoy coleslaw. Put it on this yummy pulled pork a few weeks ago. So yeah, let's grow cabbage!

IMG_6040.jpg

The other plants seem to be growing beautifully. The galactic lettuce and romaine lettuce are growing like weeds, which is fun and colorful.

My little baby kale plants, which I've been growing inside the house, are almost ready to be transferred into the ground.

The radishes are a bit of a head scratcher. Only 4 seedlings came up. I planted a zillion seeds, but only 4 actually did their thing. So... I'm going to plant some more radishes. I've still got time, since they germinate and mature the most quickly - like 24 days from planting to eating! Whaaat? I love that efficiency, Mr. Radish. I won't hold your lack of mass germination against you.

And the carrots! These seedlings are so adorable. They have actually gotten fancier looking even since I took this photo, so I will have to do another update next week. The carrots are rad little plants!

A few more photos that aren't food related, but are keeping my garden looking really good.

There you have it! The garden update! Who wants to come over and harvest with me? :)